|
Subframe Connectors
I wanted to stick the front end of the connectors in or around the trailing edge of the front subframe
and I knew the rear had to go somewhere near the front leaf spring perch. The 2"x2" tubing fit inside the front subframe easily, but it wasn't large enough to fill it, obviously...


...and it also blocked access to the rear body bushing bolt, which is why I decided to use the 2"x3" tubing (and it was recommended by a friend) which fit quite nicely up front. However, that 2"x3" would never fit at the rear, so I had to somehow join the two sizes of tubing somewhere. To achieve that I cut each piece nice and square and welded up an end cap for the 2"x3" tubing so there'd be something to which I could weld the 2"x2" tubing.


I wanted to attach the connectors to the frame, but with the perch and perch bolt right there I knew I'd have to incorporate that into the design. I decided to mount the connectors right under the frame and overlap that spring perch bolt location. I still needed to use that bolt hole to mount the spring, so I took some measurements and cut and drilled one end of the 2"x2" tubing to match:
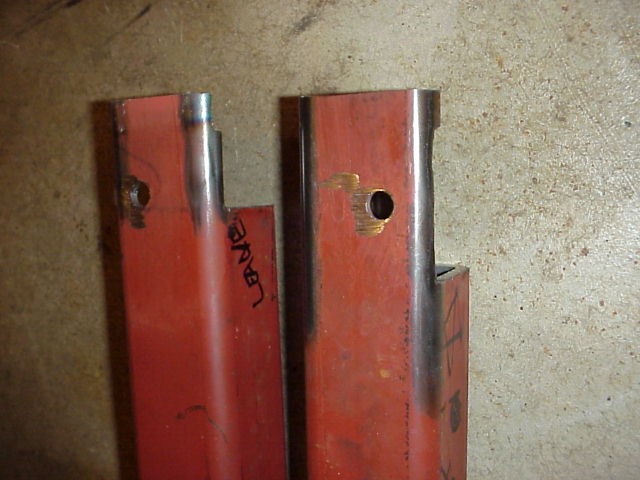


The reason I cut away some of the tubing wall is so I could get the spring perch onto the connector and have access to the perch bolt. I cut off more on one than the other because I thought I had to, I realized it wasn't necessary to remove that much so I left more material on the second piece. I think the connectors are still plenty strong due to the heavy wall thickness and the way they're attached to the car.


Unfortunately I don't have any before and after track times or anything, but it's definitely a stiffer chassis! The first thing I noticed was when I jacked up the car and put it on four jackstands. As I was crawling around under the car I accidentally kicked a jackstand. It moved. I panicked, but once I realized the car wasn't falling I looked into it more closely. Turns out that one stand was set one tooth too low and as a result it wasn't actually contacting the frame of the car. One stand was set 1/2" too low and the chassis was stiff enough that it didn't settle at all to contact that jackstand! I was pretty happy with that.
© 2020 Bruce Johnson and Craig Watson